Posts from the ‘Food’ category

Kalispell Farmer’s Market: Opening Day 2015

Today’s first Kalispell Farmer’s Market had a beautiful opening day. Obviously, it is a bit early for produce in Montana, but the vendors who WILL have produce eventually, mostly had starter plants for home gardeners. The craft vendors were there as well as the cheese folks from Polson and other food vendors. The sun was shining, the temperature at 9:00 a.m. was 51F and everyone was smiling and greeting one another.

I bought the above jellies. The folks with this booth do a great job of display and also offer tastes of everything. One of the things I enjoy most about the market is talking with the vendors. I didn’t hear the whole story here, but I know I’ll be back for more…good stuff!

That yellow and red area on the near corner is home to Shelly’s Jelly’s (www.shellysjellys.com). Shelley and Al have done a great job of putting together their selling venue and website. So much fun!

My other find was fuschia hanging baskets. I was thrilled to find the fuschia. On my mostly shaded front porch, fuschia do very well, but they are hard to find. In fact, I have NOT been able to find them for 14 years!! The women who have the greenhouse that grew these fuschia said that they started growing them because one of their father’s also had a spot that only fuschia could handle. And like me, he also loved them. They had 3 baskets and I bought all 3 … for less than 1 basket at a regular nursery. Obviously overhead costs are less for the market, but I was so very happy to find these beautiful baskets!

The green top “tent” is home to the growers I bought the fuschia from. They were fun to talk with also. I asked if they took credit cards as I had only enough cash to buy the baskets which would leave me nothing for anything else. Many of the vendors do take credit cards via the little swipe things that go on smart phones and thankfully, they were set up for that. Both women were laughing at me conserving my cash as they do the same and said that their challenge was not spending everything they made at other vendors at the market.

The market happens in 2 parking lots on the campus of Flathead Valley Community College. It is quite a pretty campus with lots of green space and attractive buildings. The College provides access to rest rooms as well as Wi-Fi for the vendors. Parking for buyers is ample and close. I think it is an impressive market and it is only one of 5 in the vicinity: Whitefish, Bigfork, Columbia Falls, Polson and this one in Kalispell. Additionally, the markets all run on different days, so vendors are able to participate in all of the markets, if they choose.

One of my baskets hanging…they are still smallish, but hopefully, they will do well on my front porch.

A beautiful day and a fun first market!

Ending the week

After rain and snow and more rain, Friday started with fog which gave way to sunshine and an afternoon temperature of 62F – a Spring day!

And after my brief foray into packaged food, I got back on my “make it from scratch” path and made my own taquitos (Baked Breakfast Taquitos) for breakfast.

Last night a cold (well, cooler) front whooshed through. I heard a bit of thunder in the wee hours and this morning is gray, rainy and blustery.

So, I decided on a bit of lemony “sunshine” in the form of Lemon Sticky Buns. I’d seen Mel’s Kitchen Café’s Lemon Sticky Buns and they were on my list of things to try.

Mine are not as pretty as Mel’s since I used a mix of whole wheat pastry flour along with the white flour (1/4 whole wheat pastry flour, 1/2 white pastry flour and 1/4 all purpose white flour) so my rolls are light brown vs white.

But, they are good and tender and flaky! And next time, I am going to try adding some dried blueberries. Currants would be good also. Or dried tart cherries…

Lemon Sticky buns … a nice bit of lemony sunshine on a gray and rainy weekend morning.

***I also subbed goat cheese for cream cheese in the glaze. I’ve subbed goat cheese for cream cheese before. I use a mild goat cheese – the logs from Costco and I like it better than cream cheese in whatever. It goes especially well with the lemon.

Mac ‘n Cheese for One

Growing up, my Mama made Mac ‘n Cheese in 1 pot…actually in a Corning brand casserole dish that went from stove top to oven. But, we had a gas range and I have electric. So, I do get a pot dirty, but that’s it…one pot, then into a casserole dish and into the oven.

The method is cook the macaroni, drain it, add butter and flour to the hot macaroni and let the butter melt and the flour cook a little. Add milk and let it thicken. Add the cheese and cook until all melt-y and then into the oven until bubbly.

My Mama has a new secret ingredient which she shared with me…add a little dry mustard with the flour. It just adds a little extra something.

I’m not that fond of leftover Mac ‘n Cheese. Some time ago, I saw a recipe that served four which used:

2 cups macaroni
2 cups milk
2 T flour
2 T butter
2 cups cheese

That’s easy to remember. So, I started making a single serviing with 1/4 cup, etc. That is a nice serving, but it is a hearty serving and I’ve taken to making it with 1/3 cup, i.e.:

1/3 cups macaroni
1/3 cups milk
1/3 T flour
1/3 T butter
1/3 cups cheese
***and a bit of the dry mustard.

I have small 5 1/2 inch deep pie plates and they hold the single serving perfectly.

And you can add other stuff!! Today, it was a chopped collard leaf and some black forest ham.

I have no idea why anyone would want to make the boxed stuff!

By the time the water is boiling, I have everything ready to go.

The macaroni cooks for 6 minutes (I threw the greens in for the last 2 minutes), drain, add the butter and flour and the dry mustard.
Add the milk.
Add the cheese – it was Gouda today.
After the cheese is melted and the sauce has thickened a bit more, pour it all in a baking dish.

Top with some bread crumbs – these are from my own bread and I learned a secret from Melissa Clark of the N.Y.Times. Make the crumbs from bread that is not completely dried out and leave them about the size you see here vs grinding them into sawdust. These make a much nicer “crust” on anything and crisp up wonderfully if you pan fry them in just a wee bit of butter or olive oil to go with lots of things for a bit of crunch.

Put that beautiful little dish of Mac ‘n cheese in the oven (350) for about 15 minutes.

So, then … by the time you…

give the dog his treat…

the cat his lunch…

and clean up the kitchen…

Lunch is ready – Mac ‘n cheese for one!

Greek week

Well, Greek end of the week anyway…

…and my own American version of Greek flavor… longtime reader Margaret can take me to task if I’ve misused any terminology :) !!!

The story really starts on Wednesday, which was sunny and warmish and beautiful and with the forecast after being not so great, I took some time to run to town for a few items and also to enjoy being out and about while it was nice! It meant a longish day as I worked into the evening to make up for the town run and so started Thursday thinking about a treat to get me going.

I had Feta and Kalamata olives: both with country of origin = Greece! I have no love for the American brands of Feta with the Greek sounding names as they just taste WAY too salty and the ingredient list says only “milk”, not “sheep’s milk”. And the Greek originating Kalamata olives are packed in red wine vinegar and extra virgin olive oil vs the canola oil that some American brands use. I make NO apology for being a feta and olive snob.

Tomatoes. Well. This time of year it can be tricky to find anything fresh that actually tastes like a real tomato. I typically buy grape tomatoes from Mexico and they are usually good, but this year…not so much. However…cut in half, drizzled with olive oil, garlic and oregano…and slow roasted (225 oven until they shrivel…2 hours or more) – they sweeten and become wonderful.

Much as I enjoyed the Feta and Chive Sour Cream Scones several weeks ago, the scones have a fair amount of butter and are a bit of a splurge. On occasion, I’ve made a Quick Foccacia (not using the pizza flavor/spices or cheese powder…subbing my own herbs of choice) and decided to see what would happen if I adapted that recipe to include feta, olives and roasted grape tomatoes…

Success!!! – SO good and much easier than the scones and no butter or sour cream so less of a hit calorie-wise with no sacrifice in flavor. As this did so well, I am sure that other adaptions of the recipe would be scrumptious also.

I simply eyeballed a mix of feta, tomatoes and olives that looked to fit into the dough. And I make 1/2 of the linked recipe using a standard bread pan vs the specified 9 x 13 pan.

Thursday.

After the sun of Wednesday, Thursday did an about face and got damp, gray and drippy…a fire was going…

And soup with toasted focaccia for lunch!

The toasted focaccia was wonderful with just a wee drizzle of olive oil.

The tomato soup is a blitz of roasted tomatoes, jarred tomato puree, oregano, garlic, cumin, a little curry powder and a puree of white beans to make it creamy. Using the white bean puree with just a smidge of heavy cream makes for a creamy soup with mostly no cream!

On to Friday.

It was time for a loaf of bread and I had so enjoyed the tomato-feta-olive mix that I decided to try a Greek-ish version of the Meyer Lemon Rosemary bread.

I added enough olive oil to a mix of tomatoes/olives/feta … enough to make a slurry – and put that in a well of the dough for my boule.

Wrap the dough around the mix, turn it over and shape it…

…give it an “asterisk slash” and bake.

Like the Meyer Lemon Rosemary bread, the slurry rises up and the result is an almost “pull-apart” bread.

…but sliceable!

And it worked with a soft boiled egg for my breakfast and as cheese toast for a side to another bowl of tomato soup for lunch.

It was a Greek (-ish) end of the week!

Nothing Greek here, but with the warm and all…some ground is showing…ground not seen for over a month! The chairs say “Hello” to the ground.

Here we go Friday!

The weather forecast for today and more notably, this weekend, calls for snow/rain/wintry mix kind of precipitation and then on and off of the same through the middle of next week.

In preparation, I’ve been spending several 15-20 minute sessions each day doing a little cleanup and removing some snow weight from things that I thought might be vulnerable…like the slide toppers and awning on the motorhome…

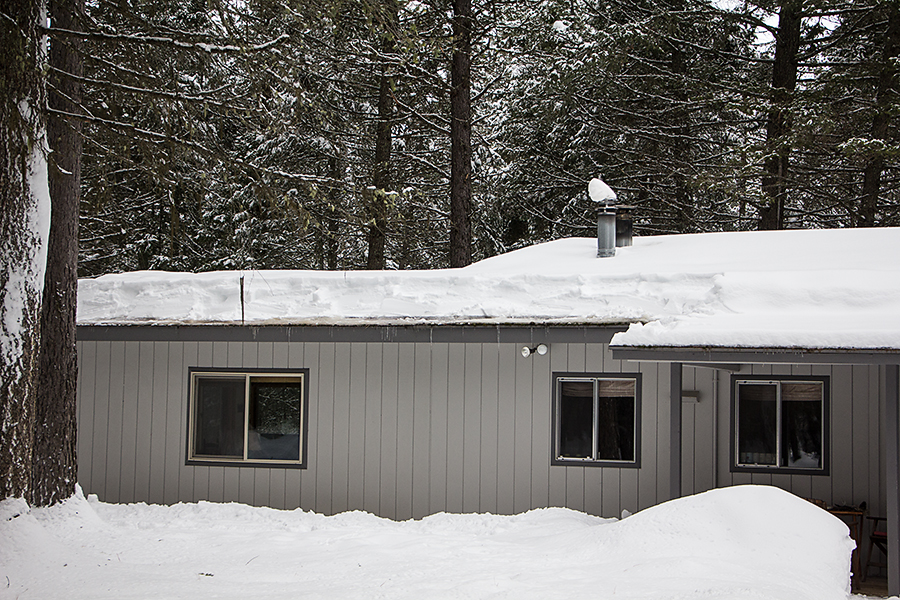
and the edge of the roof where ice dams had formed.

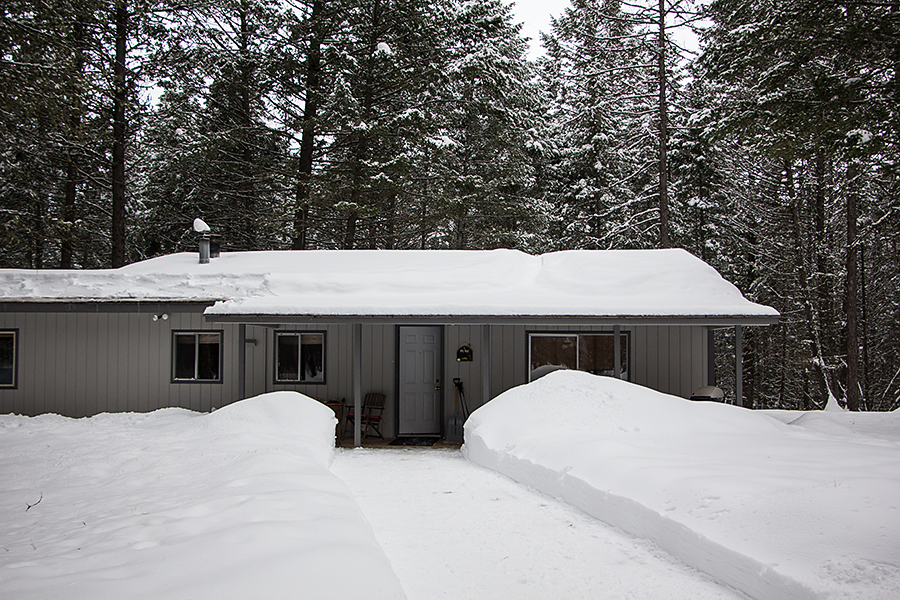
Even with the roof rake, or maybe especially with the roof rake, it is physically challenging: balancing the long tool and pulling the snow.

I was happy to finish what I wanted to get done yesterday (Thursday) morning.

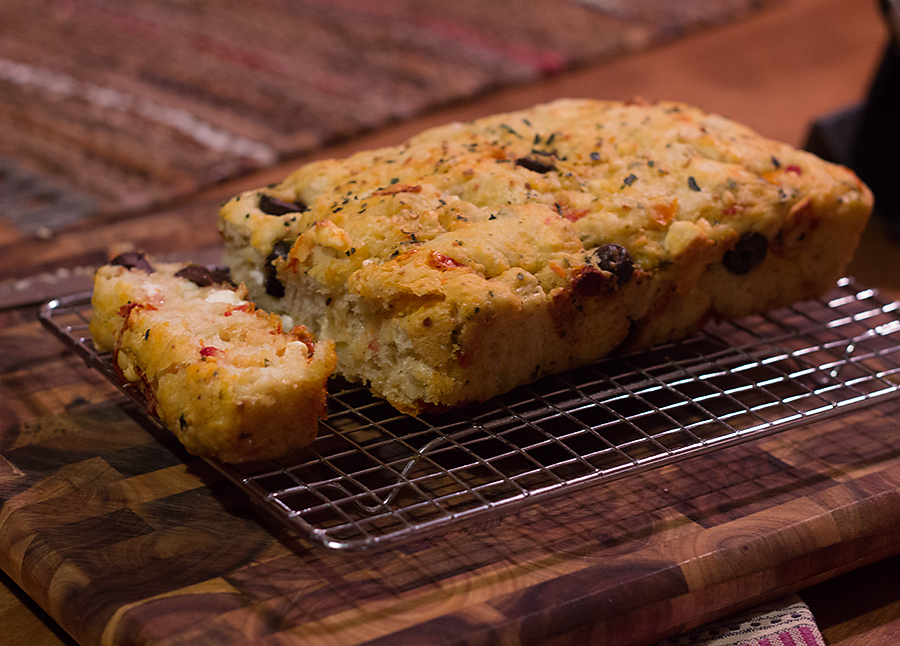
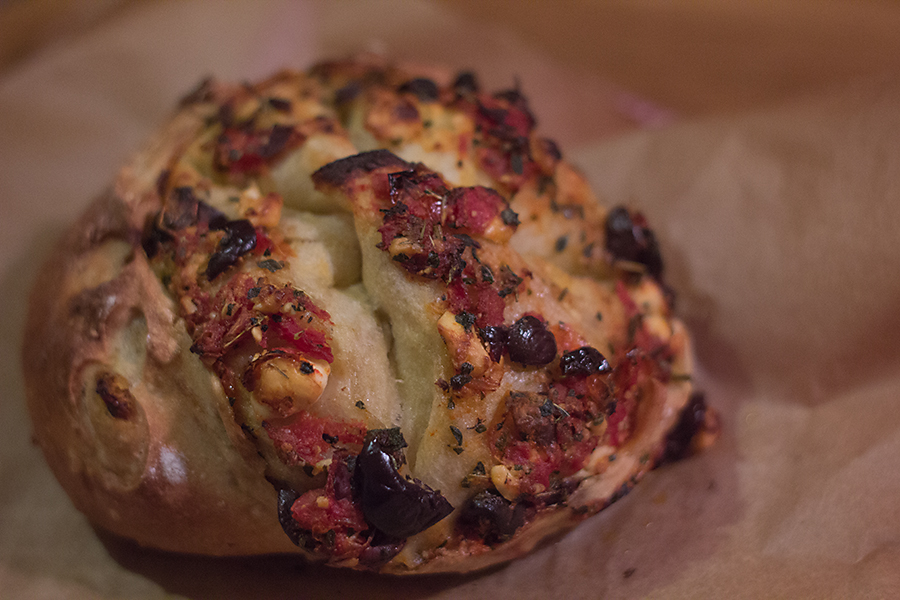
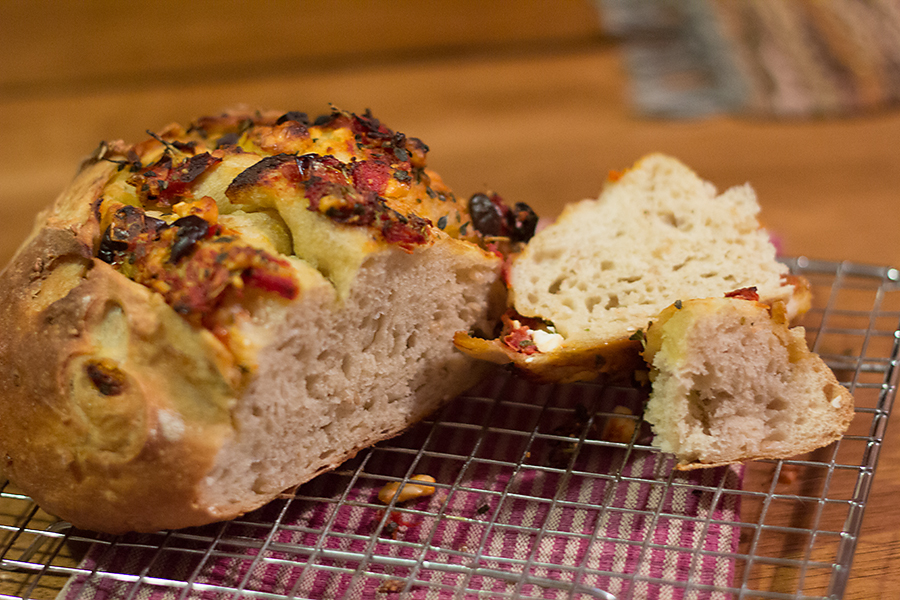
During a brief Thursday morning perusal of recipes, I found The Kitchn’s Rye toasting bread with dried cherries and pumpkin seeds. I love a dark rye or pumpernickel bread and this caught my eye with the addition of fruit and seeds.

But, I’ve been a no knead/high moisture bread making girl for over 4 years and I didn’t want to fuss so I did a quick conversion of the recipe for what I thought would work and it did!

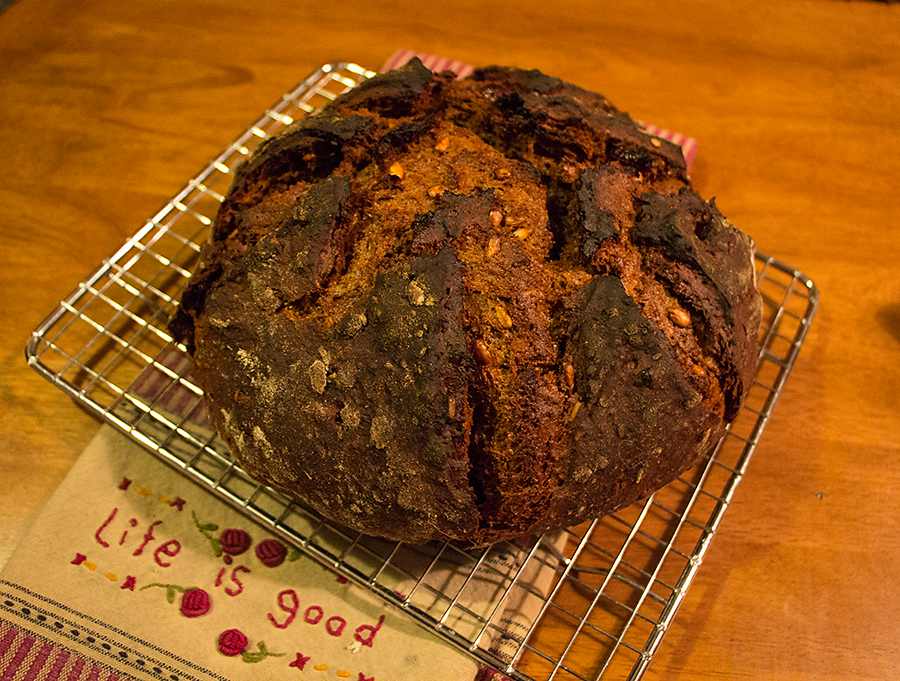
My recipe conversion and full method is at the end of this post, but the short story: I quickly mixed all, covered with plastic wrap and let it sit on the counter until last evening. Then, into the refrigerator overnight and this morning I pre-shaped the dough, let it sit for 30 minutes, did the final shape, slashed the top and popped it into a dutch oven for baking.

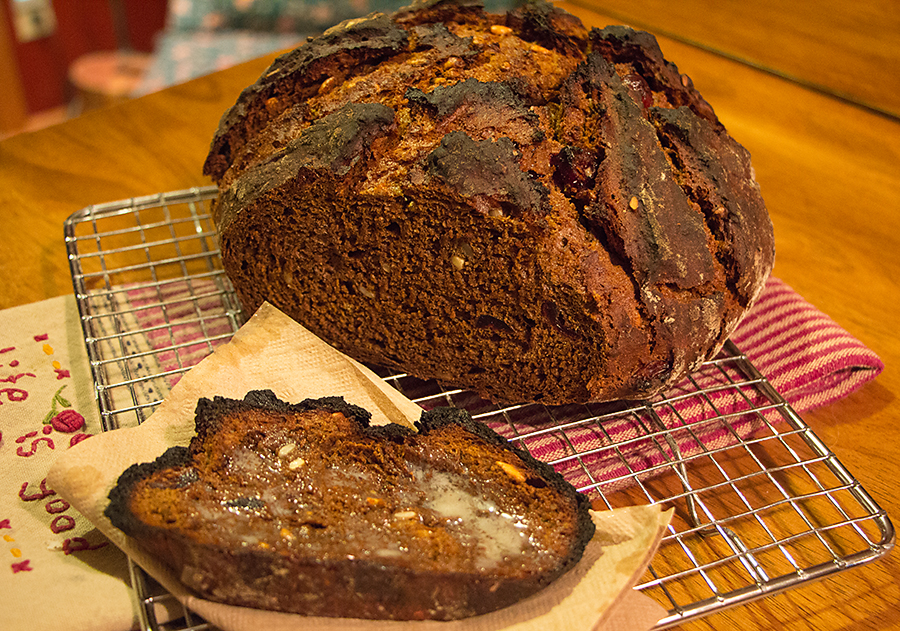
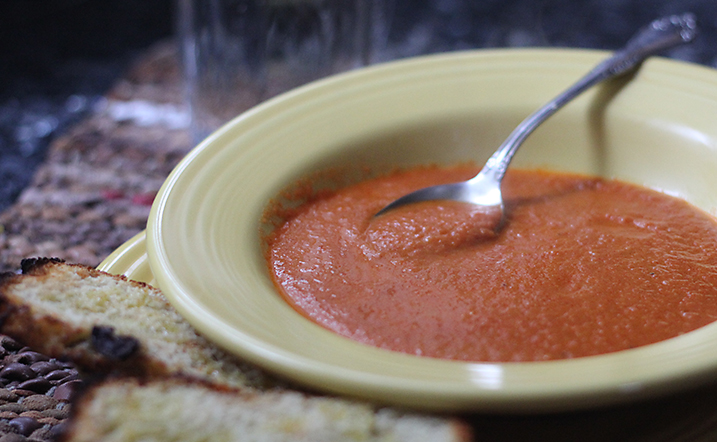
It is delicious toasted with plenty of butter and I think would be wonderful with a poached or soft boiled egg on top.

Perfect Friday treat to get me started on the last work day of the week and the start of another round of Winter!

My recipe and method adapted from The Kitchn’s Rye toasting bread with dried cherries and pumpkin seeds.

165 grams Rye flour (I used King Arthur Medium Rye)
160 grams Bread flour (I used Bob’s Red Mill Artisan Bread flour)
105 grams White Whole Wheat flour (I used Wheat Montana White Whole Wheat flour)
2 tsp salt
1 tsp caraway seed
2 tsp instant yeast (I like SAF instant)

Mix all above with whisk or sift all together.

1/4 cup dried cherries (or other dried fruit)
1/4 cup sunflower seed (I didn’t have pumpkin seeds, you can sub a seed that you enjoy)
1/4 cup finely shredded unsweetened coconut (I like Let’s do Organic)

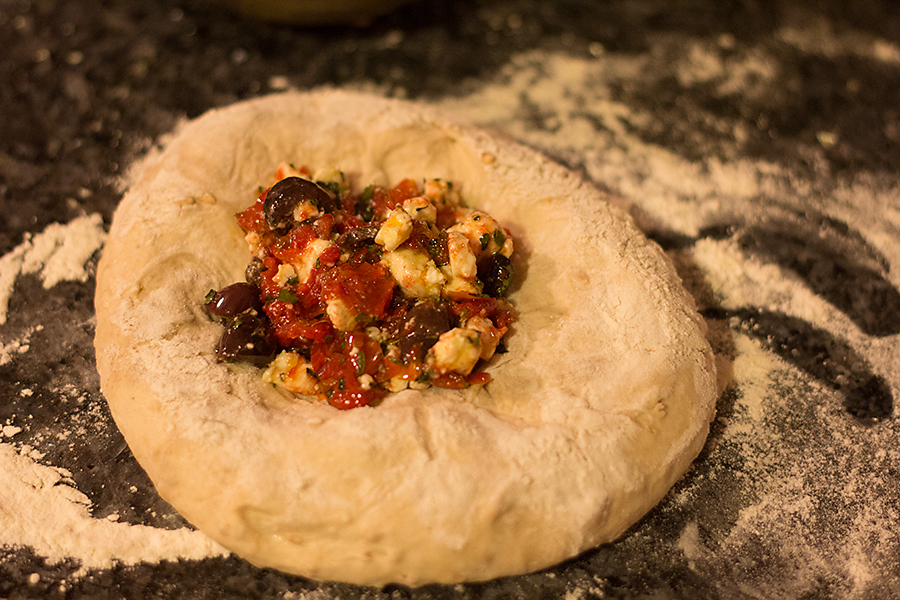
Add to flour mix and combine

3/4 cup water
3/4 cup milk
1/2 cup molasses (I used unsulphered … I might measure this just a bit on the light side next round – the bread is plenty sweet)

Combine all liquids and warm. (The original recipe says to 110. I wing it and get it very warm nearly hot).

Add warm/hot liquid to flour and combine thoroughly. I use a spoon and my hands. You can use a mixer, but that’s one more thing to wash and I’ve never used a mixer for the high moisture doughs. Now…I’ve been using this method for over 4 years and have a good idea of how the dough should feel, i.e. is it good, do I need to add more flour, more liquid ?? The above measurements worked for the flours I used. I think you should be good to go if you measure by weight. The dough should be sticky and shaggy but not wet and sloppy. It is a heavy dough.

Cover dough with plastic wrap and let it sit in a warm spot for 8-10 hours, then refrigerate until ready to bake.

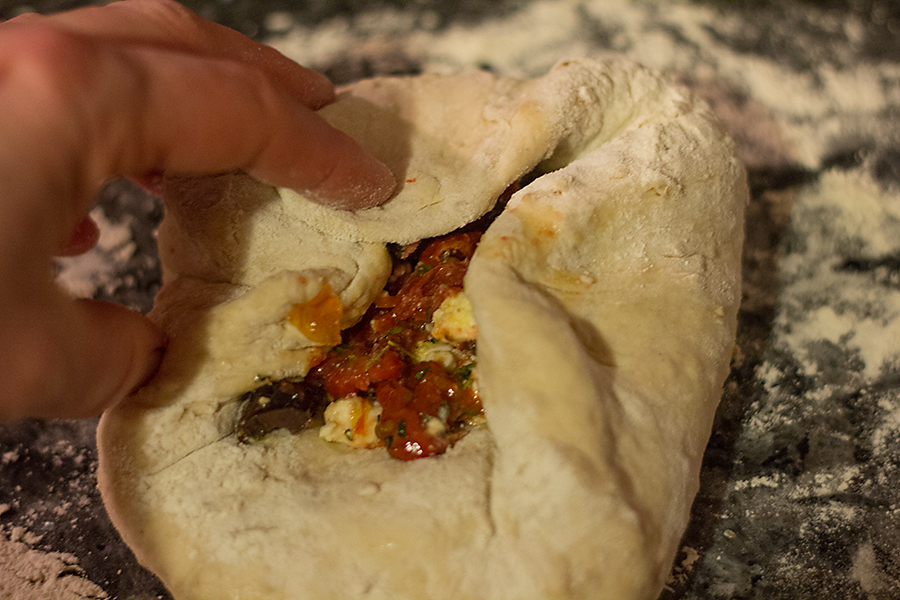
When ready to bake, put the dough on a clean and lightly floured counter. Knead and stretch gently just 30 seconds or so and then round the dough onto the counter in a smooth ball (gluten cloak method) and cover with flour cloth. Let sit for 15-20 minutes.

At the end of the 15-20 minutes, put cast iron dutch oven in the oven and preheat to 500F.

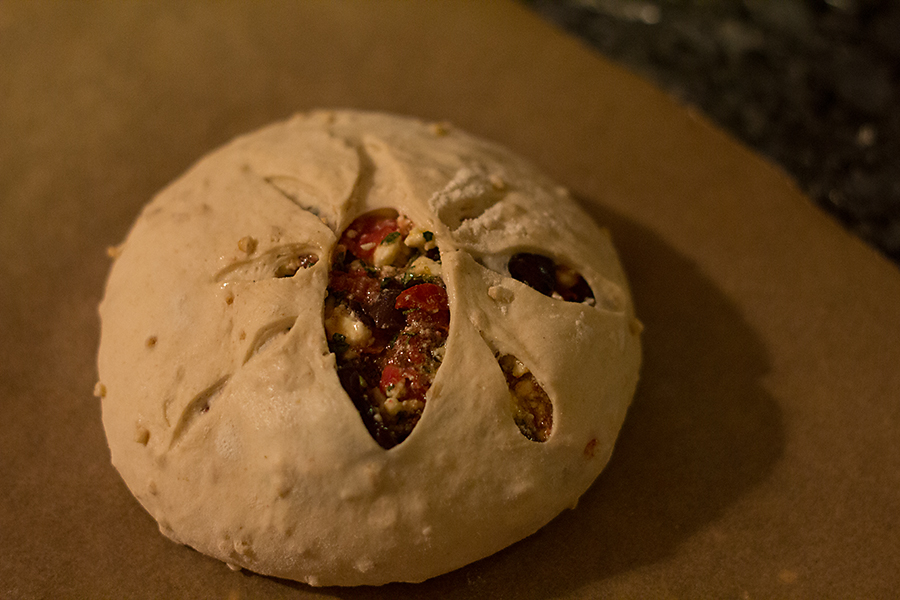
Turn the dough over and do the final shaping into a round boule and put the dough on a piece of parchment paper large enough to allow you to use the paper to lift the dough. Cover with flour cloth and let sit for 30 minutes.

At the end of 30 minutes the oven and dutch oven should have been at temperature for at least 10 minutes. Check the boule – it should be taut and a brief finger indentation should spring right back.

Dust with flour (I forgot!) and slash – I used an asterisk slash.

Remove the dutch oven, carefully lift the dough with parchment and set in the dutch oven. Put the lid on the dutch oven and carefully … the dutch oven is VERY hot!!! – put it back in the oven.

Bake for 20-24 minutes (I went 24 with this dense dough). Carefully remove the lid from the dutch oven, reduce oven temp to 475 and bake for 12-14 minutes more. The edges should be dark/some black. This dough has a lot of sugar from the molasses so it is softer than a ciabatta or baguette, but it should still be crisp on top and hard on the bottom. Remove bread and cool on a wire rack for 2-3 hours.

Credit for some of this method has to go to the following three books:

I started with Artisan Bread in Five Minutes a Day by Jeff Hertzberg and Zoe Francois. This link is for the latest version of this book and it has some wonderful updated information about the method.

This fall, I read In Search of the Perfect Loaf: A Home Baker’s Odyssey by Samuel Fromartz and learned a lot about why the minimal knead/high moisture bread works and made some adjustments in the method I’d been using from “Artisan Bread in Five…”. Samuel Fromartz, in his book, referred to Della Fattoria’s Meyer Lemon Rosemary bread which had me nearly in a swoon and I immediately bought the Della Fattoria book for that recipe.

Della Fattoria Bread by Kathleen Weber. In addition to the Meyer Lemon Rosemary bread which I made immediately, this book furthered my knowledge pre-shaping/shaping, baking, and understanding how the dough should look and feel.

Like Mr. Fromartz, I am always in search of the perfect loaf! I enjoy the chemistry of bread baking and of course, I LOVE the results.

Did anyone make it to the end of this post :) ??

Huckleberry pie and a mauve-ish end to the day

My neighbor with the backhoe LOVES pie. In the past, I’ve sent over a cherry pie (ok 2/3 of a cherry pie as I kept 1/3 for me!) as a thank you. They and now mostly Mike, since he retired and is home – have helped me many, many times with things that needed a 2nd pair of hands, tools and of course, the backhoe! Mike sent me an email after the last pie that said “will work for pie!”

Last weekend, I called for help again as the end of my driveway was in a mess after the road crews worked on snow. It is unavoidable – the road needs clearing and when the plows pass an open drive, the snow and in this case, ice – fly off the blade at the end of the drive and around the mailbox. It tends to compact as it lands and even my dream machine of a snow thrower cannot clear it.

Backhoe to the rescue!

When I emailed requesting help, I wrote that I didn’t have cherries, but I had huckleberries and would a huckleberry pie be acceptable “payment”.

I received a “YES!!!”

When I went to make a pie, I was out of the foil pie pans I use for sending pies. In our neighborly exchange of food, we’ve found that returning dishes is just a pain, hence the disposables. But, I did have some “chicken pot pie” sized foil pans…

Mini-pies it was…

Three…perfect!

In the evening, I noticed the light looked almost light purple with the snow and a clearing sky.

The soft light and the snow called us all outside for a final walk before it got dark.

That last walk, I am usually close to being done with work so am winding down. At the moment, it is after the school bus and parents have retrieved kids, but before the after work crowd comes home so all is quiet and still. Bear and Auggie and I putz around and enjoy the quiet and the ever changing and different light … this evening, the light was mauve-ish.